

Do you have an unused nook and need better storage? Does that storage also need to be a decent focal point, and fit your custom needs? Are you a bit unsure of your DIY skills and ability to pull off a built-in that doesn't look like a cake fail meme?
Well...you may have stumbled onto the right place in this monster blog post. I say it is a monster, because it is. It's long and I am going to talk you through each step of how I built my dining nook built-in. I wish this built-in was like a banana bread recipe where, you know, you could skip the blah blah blah and click "Jump to Recipe". But, alas, it's not. I did highlight the steps here where you could jump ahead to different sections...but, that's the best I got.
My hope is that this post gives you some ideas, helps you think I can do this, or even shows you step by step how to problem solve through a section of your build. When I hit publish and saw that this post was a 33+ minute read (face palm)...I remember thinking who would read this? So, if you have read this far - I appreciate you. And if you saved this post to die in one of your Pinterest folders...I'm okay with that too. It means you have future plans for something like this and sometimes even a quick visual may show you possibilities, amiright?
The WHY:
We just needed more storage in this busy area of our home. And this dining nook had precious wasted square footage that could be utilized better. Plus, this is an opportunity to make a meaningful, functional and beautiful focal point from all views in our open main floor floorplan. So, to best meet what we needed, I sketched out a plan for the space.

We live in a builder basic 1980's home...many of these style houses have this recessed nook. I believe it's for adding a china hutch, but, for many folks like us, this was just wasted dead space. Actually, I hung some string art here three years back. The actual intention behind the string was to check if a feature wall would look cool in this spot. So - to visualize - I used some nails and black jute string. The result was actually quite cool, so, I kept it temporarily...then, three years later (yikes), I was like - we need to store more stuff here. We could do with more dining room necessities storage and we desperately needed more toy storage... Preferably behind closed doors (to prevent dust build up - [preventing me from dusting (yahoo)]. So...planning for making this drawing come to life began.
HAVE I BUILT A BUILT IN BEFORE:
Nope.
But, I truly believed I could do this. So, here goes.
TABLE OF CONTENTS
Below, you can click on a heading that will take you to a particular section of the build. Even looking at the breakdown of these 19 steps...I'm like, I can't believe I built this, let alone wrote a blog post on it. Who's going to read this monster post??...it's so freaking long. But, to the three of you out there who are like me, and consume how-to's to add to your future self affirmation of yes-I-can-because-someone-else-did-it mentality, this long ass post is for you. And to the majority who hoard inspo and information on your Pinterest saves for future reference...Again, that's great too!
1. TOOLS & MATERIALS Needed
I did my best to provide enough detail of the things I used...not going to lie...there are a lot of supplies. I still consider myself a beginner woodworker, although lifetime DIY'er. So, I have a lot of tools/supplies on hand (also hoarded, but in an organized way, because I am OCD bout this stuff). And, this dining nook built-in is a good project to use up all your existing DIY supplies (kidding not kidding). Also, I'm not providing exact amounts of supplies...as every built-in is sized differently.
Power Tools | Misc Tools | Wood/Wood-like Products | Other Stuff | Paint Supplies |
Table Saw | 7/8" Forstner Bit | 1" plywood for the bench carcass (I used scrap plywood haha) | 1" 23G Pin Nails | Zinnser Bin Shellac Primer (the red can) |
Mitre Saw | Kreg Jig Mini Pocket Hole Jig | 2 - 2x12x8 Fir Boards for the Bench Topper | Brad Nails 1.25" | Paint Tray |
Jig Saw | Kreg Concealed Hinge Jig | Wood Screws 3.5" | Roller | |
Drill | Level | Wood knobs | Brushes | |
Multi-Tool | Tape Measure | 1x6 Select Pine x2 | Brass knobs | SW Diamond Urethane Cabinetry Paint |
Right Angle Drill | Pry Bar | 1x2 Select Pine | 120 grit orbital sandpaper | Painter's tape |
Brad Nailer | Box Cutter | 1x16"x8' White Wood Board - often used for shelving | Wood Screws 1.5" | Flat and wide putty knife (plastic) |
Pin Nailer | Carpenter Square | 1x4 Select Pine x2 | Wood Screws 1.25" | |
Orbital Sander | Various sized clamps | | Pocket Hole Screws 1.5" | |
| | | 6 Full Overlay Hinges (110 degree) | |
| | | 4 Inset Hinges (90 Degree) | |
| | | Pocket Hole Screws 0.75" | |
| | | 4 Brass Knobs | |
| | | Pocket hole Screws 1.75" | |
2. Demo
Not much was needed except removing baseboards. To be truthful, I had a hard time starting because these were perfectly good baseboards. Pristine, in fact. But, they had to go for the ladder base. And as it turns out, it was quite easy to remove using my multi-tool and a new blade. First, I scored the caulk line, used a small prybar to remove the baseboard.
I suggest drawing a line of where you need to cut and applying medium pressure while using your multi-tool. Let the blade/tool do the work.

As much as I was not looking forward to removing perfectly good baseboards, I was quite proud of myself at this point. An example of an ugly and unfinished view to most folks, turning out to be quite pretty to me. It's a view of opportunity. As the first hurdle of demo was done.

3. Building A Ladder Base
Using two 2x4x8's, and my mitre saw, I cut 7 pieces of wood. Two to fit the length of the opening and 5 to fit the width. Disregard how the existing baseboards extend in front of the ladder base. I ended up cutting this part off eventually.

Next, the steps of the ladder base where I wasn't able to countersink a 3" wood screw got two pocket holes each using my Kreg Jig Mini Pocket Hole Kit.

The side steps and where the steps met the back wall rail got pocket holes. I wanted to assemble this ladder base in place. The dining nook is not perfectly square. The left side had 1/2" less depth comparing to the right side. I wanted the face of the eventual carcass (the internal framework of the built-in) to be flush with the opening. So, it was important to measure, cut and fit each part of the ladder base piece by piece.

Countersunk two 3" wood screws on the fronts of the ladder base. And not shown, but, definitely must do...Attach ladder base to wall studs. I used 3.5" wood screws attached at each stud on the back wall and one on each side wall. (If you have a hard time drilling into studs like I do, drill a pilot hole first).

4. Building the Carcass
The word carcass shouldn't make me laugh every time...but, it does.
I had a few sheets of 4x4 1" scrap plywood. They came from my parent's house...their backyard under an eave actually. There was some water damage to a few sheets - I ended up cutting off any badly water damaged parts off and sanding any minor surface areas that were damaged. Wood is crazy expensive now, so, I wanted to use as much scrap wood as I could for the parts that were hidden behind trimwork and doors. Using this 1" plywood (and they were sturdy!) saved me about $250.

Because I used scrap 4x4 (ish) plywood sheets, I couldn't cut one long piece of wood to cover the ladder base. I had to cut 3 pieces of plywood, roughly 24" wide x 18" deep each, to fit over top the ladder base and act as the bottom shelf of the carcass. Honestly, this actually served me well. Because the nook is not perfectly square, it was more forgiving to cut and make adjustments piece by piece instead of making 3 exact sized boxes. I am still new to woodworking, so, I needed as much forgiveness as possible haha...
As seen below, there are 3 pieces of plywood that cover the ladder base. And 3 vertical pieces that will eventually act as internal side walls.

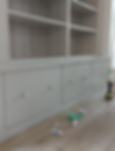
I wanted to make sure important things fit in these eventual cupboards...(also note, cupboards are able to store bulkier toys better than drawers...and these cupboards will be toy storage eventually).

Note: I used my circular saw to cut down the larger sized boards and then my table saw when pieces were a smaller size and easier (less awkward) to handle. This video is a poor example of this note actually, but, I generally followed this guideline.
Pieces of the base and side walls cut to fit as seen below.

And each board needed to get some surface water damage sanded off (sigh). Using scrap wood saved me money...it did not save me time unfortunately. But, that's ok. Before sanding...

And after sanding using 120 grit on my orbital sander.

And a freshly sanded view...Note: LABEL all your boards and which direction they face. This will help you tremendously when putting pieces back that look slightly the same yet are a quarter inch or more different in size. (Was happy I remembered to label...this round).

Another note: My cuts were not perfect. As seen by the gap below. These gaps were covered using shims or by the vertical walls, or by future face framing. It's okay to not be perfect and figure it out as you go (is what I keep telling myself).

Next, I furred out where my vertical walls met the side walls in the dining nook. I believe I did this for two reasons. One being that there was a gap on my bottom board where it met the wall. Second, being that the eventual face frame needed more thickness away from the wall. I just want to be honest and upfront...I'm not entirely sure why I did this looking back... and really wish I wrote this blog post as I built the damn thing. But, the built in works and looks good. So...(nervous sweat).
All the vertical walls got pocket holes and wood glue to attach to the bottom base. The side walls also were screwed together in several places using 1.25" wood screws.

Ok, now I know why I furred out the side walls..It's so each of the cupboard doors are the same size. Also, it will allow for a framework for faceframe to be nailed into. Phewf...mystery solved. Also, use your carpenter square a lot while you build. Every step later on will thank you for doing your best to be square.

Next, I cut 3 more pieces of 1" plywood to fit the backs of these cupboards and provide further structural support. These back wall pieces connected to the carcass via pocket holes. I also drove six 3" wood screws from the wall into studs to fully secure the carcass into the nook.
Next, I cut 3 more pieces of 1" plywood for the carcass topper. This topper spanned the full width of the built-in. I used little wood schims to ensure the plywood sat level on top of the vertical walls. Wood-glued and countersunk about thirty two 1.5" woodscrews to connect the top to the vertical walls. If you haven't guessed by now, I like to over engineer everything. It's gotta be sturdy for it to be functional. As seen below, I am pretty proud of myself at this point.
Note: As I was taking this pic of myself on my tripod, I got totally busted by a solicitor at our front door. So, I'm smiling awkwardly at him. This is why I prefer being behind the camera, rather than in front of it...

THE NUMBER GAME (to give you an idea of size and scale)
Height of Carcass: 18" (this includes Ladder Base)
Width of each cupboard opening: 22.5"
Width of Dining Nook: 74.75"
Depth of Dining Nook: 18" on Left, 17.5" on Right
5. Trimming Out the Carcass
The raw edges of the plywood boxes need to get covered up. I do realize that this will also be covered up by an overlay door...so, trimming out the carcass may not be fully necessary. However, I just want this to look more finished and profesh...and less janky is the hope.

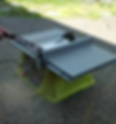
I ended up using one 1x6x8 of select pine for the top and bottom pieces of the face frame. I used my table saw to cut this.
NOTE: select pine is considered a soft wood. I looked all over (went to a couple Home Depot's and one Dunbar Lumber looking for Poplar - an affordable harder wood more frequently used for face frame in the DIY world). But, I couldn't source it. I had limited time - (my stretches of when I get to work on this thing is 1-2 hours a day while my little one napped). I was getting annoyed with how much time was being eaten up by sourcing materials. So, I took a chance on select pine...in hopes that using a really good cabinetry paint will improve it's ability to withstand dings. (Update...we have been using this built-in daily and it has worn great so far. Both kids open the bottom cabinets to access toys daily. They have banged their clunky ass toys into the frame and hit doors on nearby chairs. So far no damage...fingers crossed this is par for the course).
I digress...I've gotten off track as one does. Face frame. 1x6 cut into 1.25" for the top rail. Remainder to cover the bottom as a toekick. 1x2 select pine cut to fit the thickness of the vertical walls. I used my table saw to adjust thickness. Because of the type of overlay hinges I purchased. The stiles (vertical face frame pieces) had to match the thickness of the vertical plywood walls, so the hinge could be secured flat against the walls. This will make sense eventually. Also, I know there are hinges out there that accommodate for face frames that aren't flush with the carcass...I couldn't feasibly source them from the big box stores. And hinges in general, I found very confusing. So, I went with the route that made the most sense in my head. I took my time measuring and cutting and this is what worked for me.


Attached all the stiles to the rails via, you guessed it...pocket holes...0.75" pocket screws for this application. Also, used wood glue at each connection. Added wood glue to each pocket hole too...in hopes that this further strengthened the join.
Once all the face framing was put together. I added wood glue to all surfaces adhering to the carcass. Then used my brad nailer to attach the frame to the carcass.
And what it looks like with the face trim on...

It will just be so much better seeing a finished frame, rather than the unfinished plywood ends - if I left it raw. On Instagram, I polled how many folks would do this part. And, I was surprised how many people said no. Over 30%. This is totally OK, cause there are many ways to do a DIY, this is just how I did and learned through mine.
6. Making Cabinet Doors - Hinges
I've never made a door for furniture before...have you?
For the doors, I bought one 16x96 Laminated White Wood Panel (these are often used for shelving projects) for just under $30. I wanted the doors to be solid wood on the sides and from one piece (so technically I only have to make 3 cuts, one to fit the size 75" width of the carcass, and two more cuts to fit each door frame opening).
I have to mention that this particular wood is not typically used for cabinet doors (or maybe it is, I'm not sure...). But, it is a softer wood species (select pine that has been milled and glued together) that could potentially get dented with heavy and rough usage. So, if you are rough with your cabinetry and furniture...go with poplar, maple or teak. These doors will get used a lot by the kids, so, only time will tell how it will wear. (It's been 3 months so far, and the kids go in here daily...so far so good...no dings, no dents/scratches. But, my kids are a 6/10 on roughness with furniture...).
I started out by lining up my board against the cabinet and marking lines where cut down the board to fit the opening. Then I marked two lines at the midpoint of each middle stile.

After measuring about 30 more times...I cut the board down using a clamped level as a guide and my circular saw.

Once I had my 3 doors, it was time to install hinges. And I'm going to be pretty honest...hinges are a bit of a mystery to me, even still now. But, I will try to explain what I know about hinges, so, hopefully it helps you save some time. First, I needed to figure out what kind of hinges I needed.
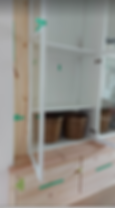
Full Overlay Hinges:

You see where the red circle is on the image. That describes the how the cabinet door sits on the side of the cabinet carcass.
The door fully overlaps the side. There are specific hinges just for this kind of door. These are sometimes referred to Euro hinges and you will notice them on a lot of big box cabinetry builds (if you have a kitchen from IKEA, my hand shoots up here, you have many full overlay hinge examples on hand).
You will notice that these kinds of doors completely cover the carcass of your built-in
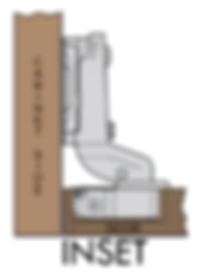
If you look above, I displayed an image of an inset hinge. Notice how the door is on the side of of the cabinet carcass...and not over top like the overlay hinge? I could have put inset or full overlay hinges on my built in - but, I felt more comfortable making a more finished look with cabinet doors using Full Overlay hinges.
I purchased a Kreg Concealed Hinge Jig to use for the first time...and found that it was actually quite straightforward to use!

I also purchased 6 Richelieu 105 degree, full overlay, soft close hinges. Honestly, they were the only ones that fit the bill for what I needed at my local Home Depot. Check how far your cab will need to open or if it would interfere with walls/other cabinets when you open the door. If you want your door to swing out more that 90 degrees...there are options for that. I knew for mine, 90 degrees plus would work fine.
I followed the directions on the Richelieu package of where to place the hinge on the cabinet. The Kreg Jig had settings on it to replicate the measurements for most frequently used measurements for hinge placement. I had it on setting #5 (this will only makes sense if you have the jig in front of you).
I swear, every time I made a concealed hole for my hinge using this jig, it made such a beautiful (and so easy) result. I wasn't precise on the placement of the hinge on the actual cabinet door. I basically placed the hinge on the midpoint of the upper and lower third of each cabinet door.

I screwed 6 hinges in, and my doors were ready to install on the cabinetry frame. There are instructions that tell you where to place the carcass portion of your hinge (so your door attaches). I'm again going to be very honest....mine didn't line up with their measurements. I basically put the two pieces of the hinge together on the cabinet door and lined it up with the carcass using my foot to balance the door (twas awkward, like this explanation). Made two marks in the screw holes where the hinge should sit...and secured the hinge to that position. This is the part where I felt unsure of why things didn't work out with the instructions. But, my door functionally works so...
Because my doors are about 0.75" and my plywood carcass was made out of 1" plywood...my doors didn't line up great on first install. See how the gap is wider on the right than the left. There are ways to adjust your hinge so the door moves up/down/left/right. Buttttt, if I moved these doors anymore, they interfered with the faceframe.

So, I shaved the middle door down on my table saw...
There...3 doors that fit. And the woodgrain lines up (for now...they get painted eventually. But, I enjoyed this view for a little while). Up till this point, I was like...I can't believe I built this. Also, that plant in the picture looks a lot more dead these days.

7. Extending the Trimwork - Building Upstands

You see that piece of (trim)work that extends past the dining nook wall? I called this an Upstand while I was building this nook.
I was actually unsure of whether the term 'upstand' was correct for what this actually is...so I looked it up.
Google says:

So...my terminology is technically wrong when addressing this part of the built-in. But, I'm still going to continue calling it an Upstand. I got the idea from @little_savage_life on IG. She posted about a company in the UK called DIY Alcove Cabinets who make built-ins into flat pack pieces that you install yourself. It's semi-custom stuff that looks fully custom. So cool. But, I live in Delta, BC, Canada, they don't ship here and I didn't have the budget for this anyways.
The upstand is made from two pieces of wood I cut down using my table saw and mitre saw to extend 2" past the door frame. It frames in the built-in doors and gives the whole built in a more custom and built-in look.
A close up of how the two pieces of wood attach to the built-in. I furred out the carcass at the perimeter walls, to ensure the upstands had somewhere to pin nail into. Notice how it wraps around the baseboard? Cool eh?

I used 1.25" 23G pin nails and wood glue to attach the upstands to the bench frame.
Following that, I cut down a piece of wood for a flush toekick. In my mind, I wanted this portion of the cabinet to look like it was inset. By framing it out with trimwork, I feel like I accomplished that somewhat well.

8. Making the Countertop
I wanted a substantially thick looking countertop for this bench part of the build....However, I didn't want to pay for an actual countertop. When pricing out butcherblock slabs, they were about $250-450 for this size. I needed wood and not laminate - as the edge is exposed on the side, and this will be painted eventually.
So, to get all that, I went with two 2x12x8 Douglas Fir boards from my local hardware store. They are about $40 each. And two boards fit the depth of the bench built-in. So, for $80 to achieve the look and scale I was going for, it was money well spent.

As seen above, they had to go top shelf to grab this wood. (If going into the lumber yard makes you feel a little out of your element...I get ya. I often don't know what I'm looking for till I see it. And I ask the lumber yard folks questions and advice. They love offering it. Also...it builds great rapport for, you know, the next time you visit and see them again).

If you can, bring your measurements to the hardware store. Most hardware stores with a lumber yard can cut down your wood for you. Often, they will do it for free (even when they say they charge per cut ...). My 10" table saw at home is good...but, to cut through a thick 2" piece cleanly, it just wouldn't do a great job.
The cuts were so clean and fit in my car after cutting it down. This saved me a lot of time, which I am all for these days.
Cutting the Fir Boards to fit
I'm going to be honest...I messed up my measurements and forgot about those damn upstands.
See below, and how the countertop doesn't overhang the extended trim (upstands)?

So, I went back to the hardware store and bought another board. This time I had better measurements. Sigh.
The first piece was easy to cut...it just needed to be 74.5" long and fit within the nook walls. None of this board is seen once the built-in is built. The front fir board, I had to make cuts so the countertop extends past the wall and rests on top of the carcass with an overhang of 0.5". So, I lined up my board with my wall, and used a straightedge to draw a line. Make sure to choose the nicest side of the board that will be exposed as the counter :)

Next, I measured my wall distance from the back counter board to the nook opening. There is a green piece of tape in the image that shows where I measured to (that tape was actually to ensure that I didn't make the bench past this height. If I made the bench any taller - my IKEA Billy Bookcase uppers wouldn't fit).
Once I had my cut lines, I used my jigsaw and a clamped metal ruler as my guide to make the cuts.
Taking your time with this cut is imperative...is what I told myself. I didn't want to F up and buy another $40 board. Haha. Also...a fresh blade on your jigsaw helps. There are a bunch of different blades specific to what you are cutting. I used a wood blade meant for fine cuts. This pack had tonnes and is about $20CAD.

Check for fit...

Success! Also, as you see below ...it's not perfect...but, it will do just fine.

Prepping the Fir Boards
First, I wood-filled all the knots, dents and imperfections.
Then, I sanded the top down using 120 grit initially, then 220grit and 320grit. I paid most of my attention to the one board that will be exposed and ignored the rest...Most of the surface will be covered by upper cabinets.
Pretty happy about getting it buttery smooth...it was a beautiful piece of wood. Shame that I will be painting it. But, oh well.

I used wood schims to ensure that the counter was perfectly level.

Then I countersunk a bunch of holes into the wood top to attach to the carcass. I over engineered this part. Why? Because I don't want the wood to move over time. Wood species will shrink and warp over time based on seasonal changes. It's not a crazy amount...but, my upper cabs will fit quite tightly within this area. I just wanted to reduce the probabilities of things shifting with time.

Because, I didn't want to fill any countersink holes on the top of the bench that will eventually show...I drove in several screws from underneath.

This is the point where I majorly hesitated ...I almost left the built-in as a bench. Cause it looked great as is...Honestly, I might section this off as a singular blog post. I think folks out there might find this part helpful...we will see.

9. Adding IKEA Billy Bookcases as Upper Cabinets
THE WHY:
Simply put, this part came down cost, woodworking skillset, and timeframe.
COST: I would need to buy about four 4x8 plywood sheets to make the framework/shelves for tall upper cabs. Plus, face framing, plus hinges, custom doors etc. Just the plywood sheets alone would cost me $300+...this doesn't account for miscuts either. That part gets pricey. I bought two secondhand (almost brand new) IKEA Billy Bookcases for $80. They had the right shape and look I was going for. Why not.
WOODWORKING SKILLSET: I am still learning. I feel like I lucked out ...like really lucked out that the custom bench worked out. Thinking about trimming and planning the cuts for the carcass framework (and finding a truck to get the plywood home) just seemed a lot. I wanted to give myself a wee break on that. And just think how I could hack up something that was pre-made. I don't even want to get into thinking about how to make glass front doors...that actually was my biggest hesitation about tackling this kind of build. Where to source glass, cutting rails and stiles correctly, routing areas for glass to sit...just a lot of skills and some tools I didn't have available.
TIMEFRAME: I think I forgot to mention I wanted to complete this built-in within 7 weeks. I was into my first week of the One Room Challenge ...incredibly behind already. I needed to save time. I was only able to work on building this whole built-in about 4-5x a week during my baby's nap time (1-2ish hours per session). With the time crunch of reveal week and limited time to woodwork...time saving's was important.
Making the IKEA Billy Bookcase not look like a stand alone bookcase...
You need to cut off the 'toekick section' of the Billy Bookcase. If you notice in the finished product, the IKEA Oxberg glass doors look like they sit on the countertop (see below).

IKEA Billy Bookcases come with a toekick. For my uppers to fit within the dining nook, I needed to shave

down a portion of the bookcase. I measured and remeasured this a lot. I actually needed to remove the bottom shelf of the bookcase for it all to fit...(yikes). But, you will see, it works out in the end. And the fact that it is such a tight fit makes the built-in look custom.
If you look at the image of this intact Billy Bookcase, you will see how there is a bottom strip, that is missing in my built-in.
Also, to check where the Oxberg Door ended on the Billy Bookcase, I attached the door to check.
Below, you can see that the bottom of the glass door hits slightly above the bottom shelf. This gave me the go ahead to cut off the toe-kick to the midline of the bottom shelf. Risky...haha. But, if I messed up....this was an inexpensive risk when all is said and done.

So, I made my cut line as seen below. The height of the bookcase would be 76.5". My 7.5" Ryobi Circular Saw cut through this no problem.

Now, to check fit...

Isssss tight...but, it's GOOD. As you can see from the above image, I had to cut the bottom shelf off. But, I reattached it later using pocket screws.
This view lived here for a few days. I wasn't upset by it...haha. I was happy at this point. Because the endless wondering prior if this strange IKEA hack would work could be put to bed. This will work.

10. Extending Each Shelf for More Depth
THE WHY:
IKEA Billy Bookcases have a pre-made depth of 11.5". This is fine for books and small baskets...but, I wanted to put large items like platters, dinner plates, wine glass stacks etc. I needed a few more inches to accommodate that.
Luckily, I had some extra Billy shelves. When we bought our house, it came with several IKEA Billy Bookcases. So, I used them as best I could to improve needed storage. See here for the 3 ways I used IKEA Billy Bookcases. In each case, I increased the depth...and it was a gamechanger.
I cut strips of extra Billy Bookcase Shelves I had on hand using my table saw and attached them to the main shelf using pocket holes. The bottom shelf looked like this underneath.

I was careful with my placement for pocket holes - so they weren't on the exposed side of the built-in once all was assembled. These pocket holes will eventually be on the underside of the cabinet.
See...the top eventually will get caulked to make that line disappear.

Now, to connect the shelves to the bookcase carcass. But, before I do that...I need to ensure I have access to the electrical outlet that is inside the cupboard.

Used my 7/8" Forstner bit and my hand drill again to make a hole that lined up perfectly...it doesn't always line up, but in this case it did and I was THRILLED.

To connect my shelf base to the bookcase, more pocket holes. These were exposed. Honestly, you could take the bookcase down and pocket hole the underside of the shelf to connect...but, I just wanted to not have to move the bookcases again. They were awkward to lift and maneuver on your own. So, I made myself be ok with putting wood plugs, wood fill and eventually paint for this spot.

And the plugs...they were just fine. And I know that I won't be seeing them much as the door covers it ...as well as baskets. You see how I am selling this to myself right now? Actively putting it out there so that this won't bother me in the future (cue eye twitch).

11. Securing the Billy Bookcases in Place
The Billy Bookcases needed to be secured to each other and as well to the studs. Let me show you how I over engineered this.
First, I clamped the Billy Bookcases together and drove about ten 3/4" wood screws into the sides to connect the boockases. (5 on each middle wall). This was Mother's Day, by the way. My one ask was to get several hours strung together to actually work on this bookcase. I think this tidbit gives you insight into how I like to spend my down time.

Next, I made 4 of these brackets out of scrap wood. The silver screw on the wood is driven into the stud. The black drywall screw is driven into an 85lb drywall anchor. The L bracket connects to the scrap wood and bookcase. And voila, the bumped out bookcase is secured to studs.

This picture of the secured shelf is crooked...but, I assure you the shelf is square and level :)

Note:
To get into the tight corners, I used a right angle drill. That thing saved my butt. Also, I cut little scrapwood spacer blocks that held the bookcases square and level within the nook. I wedged the blocks on the sides of the bookcase and to the rear of the bookcase. This kept the bookcase in place and prevented it from leaning forward or sideways while securing the bookcase to the studs.
Below, the handy right angle drill.

Also, below...and example of spacer blocks used to keep the bookcase in place while securing said scrapwood brackets.

This is the part where I kept on looking at the deadspace on the sides. And my brain wouldn't rest on the fact that I wasn't making every square inch was functional. Especially because each side fit these two things so well...click image to see...


12. Making Secret Trim Doors to Store Wine and Paper Towels
THE WHY:
I couldn't not NOT store paper towels and wine in potential secret doors in this dead space, now that I've seen it. Also, I figured this would be a good challenge on if I can do this with my limited wood working skill set. This nook is not perfectly square. On the left, from top to bottom, the width varies by 1/4". The right is worse...it's almost 3/4" variation from top to bottom. Cutting a wood panel to fit that looks like trim, yet, could swing out will be tricky.
Wine makes sense to store in a dining hutch...but, paper towels? I say, you do you...and my Costco pack of paper towels always had to be stored in several places in our home (because so damn cumbersome). So, I needed this. Real life...
How I cut this odd shaped panel:
Listen, there are proper wood working ways to do this. A scribe, or a jig, or some other interestingly genius hacks.
What I did...it's not genius. It's just what made sense in my head.

Took a 1x6 board of select pine. (Yes, I used pine again. Bad me...but, I am okay with this. Use Maple or Poplar, mmmkay?)
Went to my wall and measured the width of the spacing between bookcase cabinet and wall every 10cm from ceiling to bench height.
Used those measurement widths and made points down my board.
Connected those points like they were a kids dot to dot worksheet. Now I had a cut line.
Took my pine board to my table saw.
Slowly followed the line I drew without using my fence.
Took my board to check if it fit on the built-in...

If you look above...it fit perfectly! For a trim piece...haha. Because I want this to be a door. I needed to shave down the fit by an 1/8". I just took my orbital sander with 80 grit and sanded down the door from top to bottom. I was too worried about messing up the cut, if I took it to the table saw again. The sander worked just fine.
Putting Hinges on the Trim Door:
If you look at this door, you will see that it sits next to the bookcase and not on top of it. Remember when I talked about inset vs. overlay hinges? In this case, this would require an inset hinge. The Oxberg glass doors I purchased for this built-in are overlay doors. The only door that would fit and move correctly would be inset in this case. If I tried to do an overlay door, the Oxberg doors woudn't fit.
Used my handy Kreg Jig Concealed hinge jig again. And purchased more Richelieu hinges from our local Home Depot...but, this time 90 degree inset hinges. (I didn't want the trim door opening to collide with the Oxberg Glass Doors when both opened). Drilled two hinge holes. (Probably should have done 3 for a cab this tall...next time I will, deal?)

Again...I'm going to be totally honest. This time I followed the directions on the hinge package to a T. Getting all the hinge pieces to line up was still a struggle. But, it worked in the end. Below, I struggled with this hinge for about 45 minutes, till getting it right. Deeply regretted wearing a grey shirt...cause I was massively sweaty when all was said and done.

And because I had no chill...I installed all the doors just to see...

All I remember screaming in my head was this: Hubba Hubba...damn...this totally is going to WORK.
Even with all the ugly ass tape pulls, it still was a beautiful sight to me.
13. Making More Shelves
Time to get to the guts of this built-in. I needed to make 8 more shelves that had bumped out depth.
Here's how I did just that:
Take the original shelf.
Using my table saw, I cut additional 3.25" strips of extra bookcase (I had a few extra shelves on hand). See below.

Scuffed the shelf and the strip with 220 grit. This will help with paint adherence later.
Made 5 opposing pocket holes to connect the strip to the shelf. I wanted the boards to cinch together.
Used wood glue in the seam and in each pocket hole. Used 1.75" pocket screws to connect.

Repeated this 8 times.
There is one middle shelf that the Billy came with already assembled (again, this is secondhand). I left this shelf at 11.5". You don't notice it because the rail of the Oxberg door covers this shelf.
Below, you will see one shelf assembled. If you can, try to have an idea of what you will be storing on your shelves. I knew I wanted a set of walnut colored baskets on the bottom shelf. It kind of set the spacing for the rest of the shelves. I went for symmetry in spacing based off this first shelf.
So close...

There she is...

I was internally giddy at this part. I could see the full shape. Knew that I was on the right track. Things were looking better than the sketch (the best part). Now, it was time for finishing ... and making her pretty.
14. A Note on Shiplap
THE WHY:
We have vertical and horizontal shiplap in different areas of our home. I am a big believer in having a cohesive home that transitions from room to room. Not everything needs to be the same (because that is no fun). But, elements need to repeat to unify the home. For myself, millwork is an important aspect to repeat in areas.
Backing the built-in with shiplap not only will give it a subtle and cool backdrop
It will also improve the structural integrity of the bookcase (the shelves and extended shelf strip will sit on the shiplap)
The shiplap plays a big role in finishing. Because there is a gap on the sides of the bookcase (because I increased the depth), I need to cover this...
I used Metrie 5.5" painted shiplap. I always try to buy these guys when they go on sale. A few years ago, they sold for about $7 a board. Now, it's almost double. Moral of the story...buy these guys when they go on sale.

I did the math on this...it works out to about $3.27 per sq ft. I had about 57sq ft to cover. With 10% overages, this cost about $206 to shiplap not including tax. The level of finish this will provide is worth it...(although, it hurts that just a little while ago, this would have been $109 to do...but, supply chain and inflation during the pandemic. What can you do? The answer is not shiplap, but, that's no fun.)
Before I installed shiplap, I wood-filled all the shelf holes. This is a crucial step in making the built-in look custom. Also, it was a few day process to wood fill...as the holes are big-ish and wood filler shrinks. I would sand and reapply any sunken/areas with gaps. So, it was good to get this process started early.

15. Creating a no-hardware finger pull for the secret trim doors
THE WHY:
I was getting tired of opening the secret doors with the painter's tape that always seemed to rip off when I needed to open the door. When this built-in is finished, I want the trim doors to have an understated look. So, going with a minimal, modern and clean hardware option was essential.
I am loving the modern look of no-hardware hardware....pulls and knobs that are integrated into the cabinetry. I also love mixing hardware...and in this built-in's case, there will be 3 different types of hardware. Yet, they will be unified by shape (round).
Using a 7/8" Forstner bit, I drilled a hole into the secret trim doors. I lined up the hole with the middle rail, and offset the placement to the outer edge. To see the how-to video on it click here. It's a link to my IG page...shameless plug - but, I already did the work here to make that reel, so why not. (PS. I story'd how I built these built-ins in there too...they are in my story highlights Built-Ins 1, 2 and 3. More details and videos, if you're looking for more).
I used 120 grit sandpaper to clean up the inner edges. I want this to be smooth to the touch.
When drilling your forstner bit hole...don't forget to put a piece of scrap wood behind your door. (This may seem obvious to do, but, for beginner woodworkers - it's not.) This makes a cleaner through and through hole, less tear out.

These finger pulls worked great...and 7/8" size fits small and large fingers alike.

16. Priming the Built-In
All the shelves and surfaces have been sanded with 220 grit. Tack cloth and cleaned up. All the seams on the shelves have been caulked. It's time to prep this built- in to paint.
Painting laminate is not impossible. It just needs a good primer.
I used 2 coats of Zinsser BIN Shellac based primer. This preps laminate to have a surface that paint can adhere to. If you're painting IKEA furniture...use this primer first.

I used 2 coats of primer. Waited 2 days in between coats to cure. Also, this paint is super smelly. Wear a mask. In between coats, lightly sand the surfaces down with 320 grit to get a smooth finish. Tack cloth is your best friend in cleaning up all the dust.
I painted the built-in before I shiplapped... this included painting the rails and styles of the Oxberg doors. (not shown)
Before two coats:

After first coat...(late night paint sessions at this point)

After second coat...

I had a major hesitation at this point not keeping the built-in white. It looked so good being the same color as my walls. However, I knew I needed to stick with my original vision. So, I enjoyed it being white for a short while.

17. Installing Shiplap
Save yourself the headache later and paint the sides of your shiplap boards first...before install. When the shiplap is installed, you need to break out the little brush to get in all the gaps. No one wants to do this...
As seen below, the shiplap looks terrible on beginning install..but, it's worth it in the end. (Certainly makes you question your choices when the partially painted panels get installed and look ratty like this...)

I measured the midline of the bookcases and determined the spacing of the shiplap to centre on the opening. What I discovered is that if the shiplap is not quite centred, it still looks ok. (it was off by .75", but, in doing this, it save me from having to shave down a lot of shiplap boards on my table saw). I didn't notice that it wasn't perfectly centred in the end.
I used 1.25" pin nails and my pin nailer to secure these boards to the wall. It was incredibly handy having this pin nailer...because the holes were so small! I woodfilled most of them and the paint took care of (filled) the ones I forgot. I have the Ryobi Pin Nailer. This one was gifted by Ryobi to try during my One Room Challenge. Honestly, I would have bought it myself, it was a game changer for the finished look. The nails were so small and it is such a lightweight tool. I had a lot of pin nails to drive...so, this detail was a difference maker.
I made 96 cuts with my mitre saw (plus more...because miscuts...) and used woodglue for each panel as some extra insurance to adhere the shiplap.
For the end pieces, I used the table saw to trim down the width. Because you can open those side trim doors, I didn't want to see shiplap in these spots.
TO COVER THAT GAP:
Remember how there is a gap on the sides of the Billy Bookcase, because I bumped out the depth? I covered the gap with one shiplap panel.
I was ok with the little half step edge that shiplap has to connect two boards. It actually made for a nice gradual transition from bookcase to panelling. Which is great, because it saved me time not having to rip a bunch more shiplap boards down. A closer look at how the shiplap board looks on the sides of the bookcase is seen below.

I was legit tired by this point...but, was very happy to get all the shiplap boards up. The pre-painted sides ruins the vibe, but, makes for a better before and after.

All seams were caulked and pin nail holes were wood filled. For the gaps between the shiplap, I used a plastic straw to clean up the caulk that clumps up. Works great.
A close up of the caulked/wood-filled view...this guy was ready for paint!

18. Painting the Built-In
Hallelujah. Made it this far in the blog post? I feel like I am re-building this nook, writing this out...just takes a long time. As much as I want to say, building this is quick and easy...it is and it isn't. What makes the process somewhat quicker and easier is planning and research. I just hope that some of what I have detailed (although long post) provides some useful intel that saves you time in future.
I digress...let's paint this bad boy.
To catch up:
All parts of the built-in have two coats of Zinsser Bin Shellac Primer. This includes the front and backs of the IKEA Oxberg doors.
Paint: Sherwin Williams Emerald Urethane Trim Enamel, colour matched Benjamin Moore Revere Pewter. I ended up doing 2 coats on the back of the Oxberg Doors and 3 coats everywhere else. Click the image below to read details ont his paint. It sells for just over $100 a can.

TIP: Paint the backs of the Oxberg doors first. Do this because by the time you finish painting the fronts...you will have zero willpower to finish the back. And the back will be somewhat visible from the sides. Also, when you open the doors, the whole inside will be painted. It will just look a wee janky if the backs aren't painted. (Also, do what you want. I didn't paint the back side of my cupboard doors on the bottom part of this built-in...so, I'm a total hypocrite).
Second Tip: Watch this video I made on how I painted the glass doors without having to tape...streamlined this process significantly!!
This was coat 2 on the doors. (In truth, it felt like coat 72...I was so done with this built-in....but, also so very excited to be almost done. Plus, it was starting to look like the initial idea in my head....which is the necessary push to get to that finish line. I could see the light...and the light was looking GOOD).

For the actual built in, I brushed the corners and rollered the rest.
For the glass doors (Oxberg Doors), I rollered the rails and stiles and used a brush/wide plastic putty knife for where glass met cabinet.
In between every coat, to get a smooth and more profesh finish, lightly sand with 320 grit. Use tack cloth to clean up the dust. This also helps for better adhesion of the paint.
Coat 1
Excuse me while I wipe the invisible tear from my cheek...

Coat 3
I would like to perma-name this Hubba Hubba...

I would just like to mention that one of the reasons why I love BM Revere Pewter so much is this: It is a perfect stone colored backdrop that reads warm and cool, classic and clean. It's a color that can blend seamlessly in a modern, traditional or rustic setting. One that pairs beautifully with minimal black accents, whites, and walnut wood tones.
19. The Finishing Touches
omagaw omagaw omagaw..so close to being done.
HARDWARE:
The IKEA Oxberg Doors
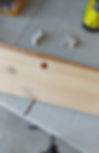
I had these heavy lacquered brass knobs that I found secondhand for a few bucks. The ones on the marble trivet are the knobs in their natural state. The ones below on the counter are ones that I toned down the sheen with Rub'n'Buff.

Rub'n'Buff in European Gold. I highly recommend using an old makeup brush to apply. It makes for a much more even application than using a rag.

The Base Cabinet Doors:
I really wanted a furniture feel to this part of the cabinet. To be honest, I went down a dark hole when it came to choosing hardware for this built-in. I almost went with much more modern and showy linear pulls, black knobs, gold cup pulls...but, stopped. Whenever I think things are too much. They usually are. That's when I sit back and simplify.
To echo the round shape of the glass door knobs and finger pull, I paired wood knobs painted the same cabinetry color as the built-in. Understated and muted. I liked these so very much.

I hung them paired and centred on the door. I just measured each spot and drilled a hole. This was another point where I was super scared to mess up. Thinking about having to rip down a new door, hinges, painting over and over and over again...let's just say I measured more than twice...
I bought these inexpensive knobs off Amazon.ca. Pairing them on the cabinet door gave the illusion that these were drawers...which they're not.

NARROW WINE RACKS:
I do need to mention that my husband installed one part of this built-in. I picked up 4 of these IKEA Vurm Wine Racks. I found two of them secondhand for a few bucks and bought two more for $10 each. I got Mike to install them while I took the kids to the park. Now, he says, "when we built this built in"...that bugger. I do have to mention, my husband is very handy when it comes to house stuff...he just doesn't prefer to be.
Seen below, Mike's contribution to this built-in. (That troll...)

Rug Source: Loloi Billie

Adding this dining room rug lead to me removing the B&W striped rug in our breakfast nook...but, I am ok with this. Cause I can't fully describe how much I love this Billie rug...it's so beautiful in real life.

AND LAST BUT NOT LEAST...THE DOORS...

By putting doors on these shelves, I'm going to save myself from so much dusting. Again, wiping that invisible tear from my cheek....
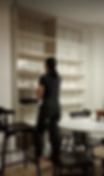
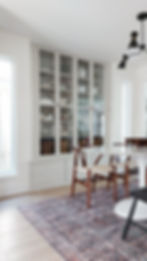
20. The End Result
Is this built-in perfect? Nope. But, I can honestly say it exceeded my expectations. I learned so much from doing this build. Mostly, I learned to trust myself more. I ended up finishing this built-in just in time for the One Room Challenge Room Reveals. Here is the post ...and what I wrote:
The built-in is done! And I can't believe I built this. Really. From concept to creation, every step of the way - I was uncertain if I could pull it off. Can I build a custom bench? Would it look weird to pair it with @ikea Billy Bookcases, glass doors and secret trim storage compartments? Would it fit...would it even work?!
If you have been following along with me for a while, you will know that I don't hide the fact that I'm uncertain of what I'm doing for almost every step of the way. I'm scared of saws, avoid loud noises and don't love creating a mess.
This built-in is a realization that I can accomplish more. To trust myself more. To lean into the uncertainties, because, these uncertainties help you stop and listen to yourself. Then address them through research, trial and error, practice... This all doesn't happen overnight. This happens over time and with failure. But, with these helping moments of uncertainties, incremental improvements over time, ongoing learning and a willingness to fail - things work out. They better than work out. They exceed your expectations and surpass the expectations you've laid out for yourself. Not to sound too corny here, but, this built in is a coming of age moment for me...a feeling that I'm just getting started.
Thank you @oneroomchallenge for creating this event and to @apartmenttherapy for sponsoring it. It really is an opportunity for people like me to push myself and try. There are so many incredibly talented individuals out there who are revealing their spaces! Go check them out and cheer them on!
Also, this room is not done. Haha. My pendant light didn't show up in time, I have more painting to do...just more. And that's ok. I'm still very proud of how far this view has come.
Spoiler alert: I haven't touched the dining room since finishing this built-in. And that's totally OK. I am so proud of this guy...so so proud. And to be honest, I can't stop thinking about what to build next...feel free to visit my IG story highlights for more detail of this built in. And if you have any questions, drop me a msg below!
BEFORE/AFTER

BEFORE/AFTER


MORE AFTERS


AND HOW THE DINING BUILT-IN MIXES IN WITH OUR KITCHEN CABINETRY

Thanks again for reading! Visit my IG page for even more on this built-in...Have a great day!
*Note: There are some affiliate links linked on this blog. Truthfully, there are less than a handful...and only if you buy through Amazon.ca
DISCLAIMER: Please use power tools at your own risk. This is a personal blog. Any views or opinions represented in this blog are personal solely to the blog owner and do not represent those of people, institutions or organizations that the owner may or may not be associated with in professional or personal capacity, unless explicitly stated. Any views or opinions are not intended to malign any group, club, organization company or individual. All content on this blog is for informational purposes only. The ownder of this blog makes no representations as to the accuracy or completeness of any information on this site or found by following any link on this site. The owner will not be liable for any errors or omissions in this information nor for the availability of this information. The owner will not be liable for any losses, injuries, or damages from the display or use of this information.